| The Christmas holidays started and boredom set in so I started a project, in fact my first nodding project! The victim was an old 400w generic psu that was unused and unloved having been replaced by an awsome 550w unit. Because the materials I used are so cheap the 400w is in essence a practice for my 550w psu. Destruction doesn't matter in this mod ;) *If you open a psu up you will void the warranty and risk electrocution! (always wait 10mins for cap's to discharge) |
 This is the original condition of the psu (almost). It was originally painted grey and had big ugly warranty stickers all over it! I sanded off all the grey paint and removed the stickers. Alas the stickers left a thick, scummy residue which I had to remove with a glass scraper and white spirit. I also took the opportunity at this point to tuck the aux 6 pin connector inside the psu, for as yet I have not seen a single computer that uses it. To sand the casing I had to remove the PCB (to avoid shorting it out with grains of metal) This was relatively painless as it was only screw down. That was until I puled it away and found that the PCB was attached to the plugs at the back which were not removable. So I de-soldered the PCB from the plugs and carefully noted down the wire colors and locations on a sweet wrapper :>. Once I had sanded the casing I realized that these solder joints would have to be very good as they took mains electricity! This is the original condition of the psu (almost). It was originally painted grey and had big ugly warranty stickers all over it! I sanded off all the grey paint and removed the stickers. Alas the stickers left a thick, scummy residue which I had to remove with a glass scraper and white spirit. I also took the opportunity at this point to tuck the aux 6 pin connector inside the psu, for as yet I have not seen a single computer that uses it. To sand the casing I had to remove the PCB (to avoid shorting it out with grains of metal) This was relatively painless as it was only screw down. That was until I puled it away and found that the PCB was attached to the plugs at the back which were not removable. So I de-soldered the PCB from the plugs and carefully noted down the wire colors and locations on a sweet wrapper :>. Once I had sanded the casing I realized that these solder joints would have to be very good as they took mains electricity!
|
 This is after I had sleeved the Molex connectors, with the connectors on a computer psu it only matters that the right colored wire is in the right part of the plug. This makes it easier to sleeve Molex connectors as the 2 center pins are black and the side with the ridge (diagram at page bottom) is yellow, red goes in the remaining hole. The fans are a good way of testing if the red and yellow wires are the right way round, if they are the wrong way round the fan will spin slowly and led's will be dimmer. As you can see I have turned the psu on without a motherboard, a method for doing this is lower down the page. The smaller blue led fan latter ends up inside the psu, it actually is very bright but my camera has a too bright flash! This is after I had sleeved the Molex connectors, with the connectors on a computer psu it only matters that the right colored wire is in the right part of the plug. This makes it easier to sleeve Molex connectors as the 2 center pins are black and the side with the ridge (diagram at page bottom) is yellow, red goes in the remaining hole. The fans are a good way of testing if the red and yellow wires are the right way round, if they are the wrong way round the fan will spin slowly and led's will be dimmer. As you can see I have turned the psu on without a motherboard, a method for doing this is lower down the page. The smaller blue led fan latter ends up inside the psu, it actually is very bright but my camera has a too bright flash!To sleeve a wire firstly you have to remove the Molex plug this is achieved by pushing the Molex extractor into the plug and pulling the relevant wire until there are no plugs on the cable. Then work back from the psu adding each section of sleving sequentially along with each new plug. The heat shrink tubing is used to sleal the ends of the sleaving as it frays very easily... Simply slip the heat shrink half over the sleving half over the wires and use a power full hairdryer to shrink it. To secure the sleving inside the psu I used Zip ties as there wasn't much heat shrink in the kit and its not visible inside the psu! |
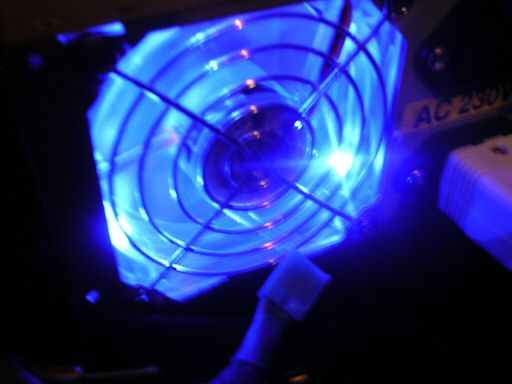 Next I replaced the stock black fan with a blue led fan. To do this I simply opened the psu casing and chopped the wires off the old fan and soldered the new fans wires in its place. Some older psu's may have non standard voltage fans in them so please make sure your not about to run a 12v fan on mains power! Next I replaced the stock black fan with a blue led fan. To do this I simply opened the psu casing and chopped the wires off the old fan and soldered the new fans wires in its place. Some older psu's may have non standard voltage fans in them so please make sure your not about to run a 12v fan on mains power!
|
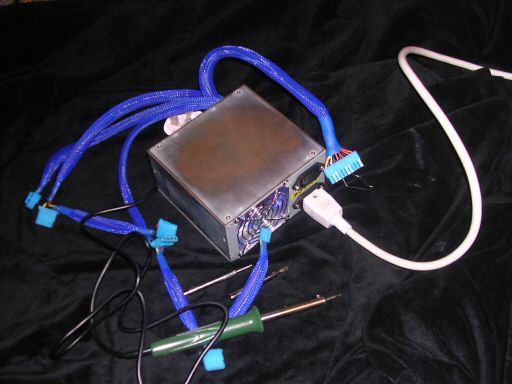 The last thing I did, sleeve the 20pin ATX connector, although many people will think "eeek 20 pins" when confronted by this connector, it's not actually that difficult. Firstly check that the wiring is the same as on the diagram at the bottom of the page (if it isn't make your own!) then proceed to remove all the pins from the connector (takes about 20mins) taking care not to get any of the pins stuck in your thumb like I did! Put the sleving and heatshrink on the wire and proceed to wire the pins into the connector as shown in the diagram. The last thing I did, sleeve the 20pin ATX connector, although many people will think "eeek 20 pins" when confronted by this connector, it's not actually that difficult. Firstly check that the wiring is the same as on the diagram at the bottom of the page (if it isn't make your own!) then proceed to remove all the pins from the connector (takes about 20mins) taking care not to get any of the pins stuck in your thumb like I did! Put the sleving and heatshrink on the wire and proceed to wire the pins into the connector as shown in the diagram.
|
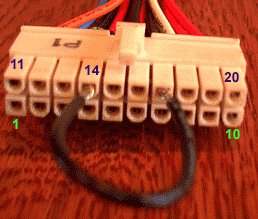 To test run your psu without a motherboard, put a wire across the pins shown in the diagram. This fakes the "power good" signal and will turn the psu on allowing you to plug fans in ect. To test run your psu without a motherboard, put a wire across the pins shown in the diagram. This fakes the "power good" signal and will turn the psu on allowing you to plug fans in ect.
|
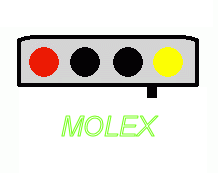 Diagram of 4pin Molex connector Diagram of 4pin Molex connector
|
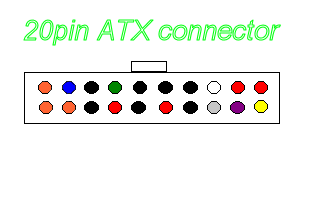 Diagram of 20 pin Atx connector. Rember to check your wire color matches before taking it apart! Diagram of 20 pin Atx connector. Rember to check your wire color matches before taking it apart!
|
| Products bought: Ebuyer blue Molex kit actually is a full psu modding kit with sleving heat shrink and tools cost. Ł3 Ebuyer value 80mm blue Led fan cost Ł1.17 noise level is ok'ish not quite and not loud and similarly middle of the range airflow, leds not especially bright. cost Ł1.17 total cost: Ł4.17 tools used: Soldering iron (soldering fan wires) Scissors (cutting wire) Molex and atx extractor (included in Molex kit) Hair dryer (shrinking heat shrink) Teeth :> (stripping wire) |

Site Counter